

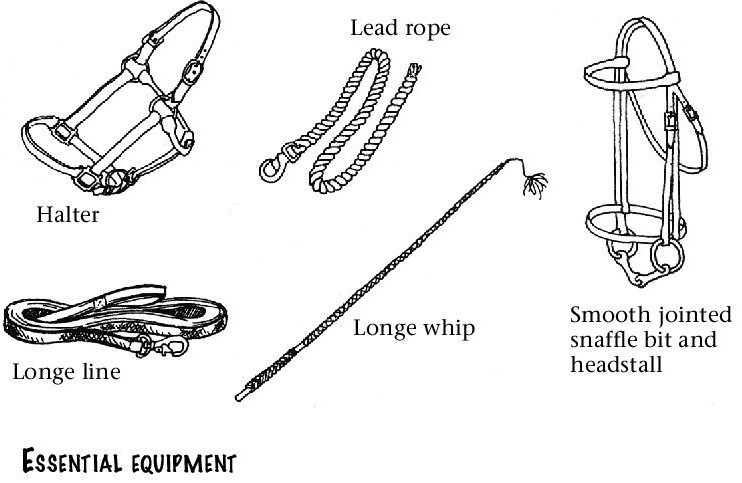
Clipping and Trimming
For neat appearance and showing, long hairs usually are clipped from the muzzle, ears, jaw, fetlocks, and bridle path. Different breeds have different clipping requirements, and you may trim your horse according to its breed type.
Bathe and dry your horse thoroughly before clipping. Start practicing a month or more before a show to accustom your horse to the clippers. Grasping an ear may quiet an uneasy animal. Place a firm hand near the area to be clipped to reduce sensitivity.
You need electric clippers, hand clippers, or a comb and a pair of sharp fetlock scissors with curved blades. Electric clippers are easiest to use and give the best results; but you can do a fairly good job with scissors, a comb, and a lot of patience.
The following clipper blades are recommended:
#10 for general clipping #15 for finer clipping
#40 (surgical blade) for “sharper” ears and bridle path
Have clipper blades sharpened periodically. Use a lightweight oil or kerosene on the blades before, during, and after clipping for a painless, smooth job.
If you use scissors, lift the hair with a comb and then snip it off to give a smoother surface and protect the horse from an accidental jab.
Hand clippers are hard to operate, tiring to use, and do not blend hair well.
Muzzle
If you decide to remove the whiskers, first use the #10 blade. You then can clip the muzzle more closely with a #40 blade or finish carefully with a safety razor. It is not required that you remove the whiskers completely.
If your horse is pastured most of the time, it is best to leave whiskers about 1 inch long. Never clip the eyelashes or the hairs inside the nostrils. These are essential for the horse’s safety and comfort.
Ears
Hold an ear in one hand and clip the outer edges. Clip downward on the upper part and upward along the lower curve of the ear. To leave a natural point, do not clip the tips.
Trim the inner ear even with the edges to give a neater appearance without removing the inner ear hair. If you clip the inside of the ear, first put a large piece of cotton in the ear to keep hair from falling down inside. Brush the inside of the ear clean before removing the cotton.
Horses kept on pasture either need the hair left in the inner ear or a good insecticide to protect them from flies and gnats.
Jaw
Trim the long hair between the jaws and under the throat closely. Use a #10 blade and clip against the direction of the hair growth. Do not clip the cheek or jowl, because this changes the color of the hair.
Legs
There are two ways of clipping legs: trimming and booting-up. Trimming is done in the direction of the hair growth, and booting-up goes against the hair growth. If the horse does not stand still, a helper could pick up the opposite foot to help prevent the horse from moving.
Trimming
(#15 blade recommended)
Trim excess hair from the lower legs by pointing the clippers down and running them lightly and evenly down the leg. Repeat several times, being careful to lift the blades gradually at the end of each stroke. This procedure thins and removes excess hair, but does not change the color of the clipped areas.
To trim the fetlocks, pick up the hoof and run the clippers around and under the bulge of the fetlock joint.
Reverse the clippers and trim the hair at the coronet band by clipping upward, making an even edge around the hoof.
Booting-up
(#10 blade recommended)
Clip against the direction of the hair, blending carefully below the knee and hock. This is often done on white legs.
Carefully peel or cut off chestnuts (the horny, insensitive growths found on the inside of the legs above the knees and below the hocks). They are softer and easier to trim after bathing. Trim off ergots (small, horny growths on the back of the fetlocks) close to the skin (use scissors) to allow close clipping of the fetlock hair.
Trimming and Grooming Breed Preference
Bridle Path
Use a #15 or #40 blade (#40 gives the neatest, closest trim). Clip forward toward the poll to keep the bridle path from getting longer each time it is trimmed in case the clippers slip. The length of the bridle path should be a minimum of 1 inch or per breed standard.
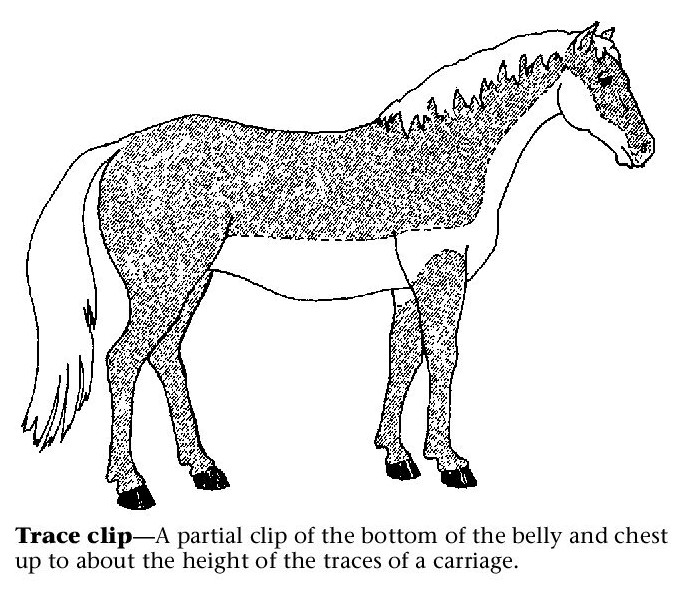
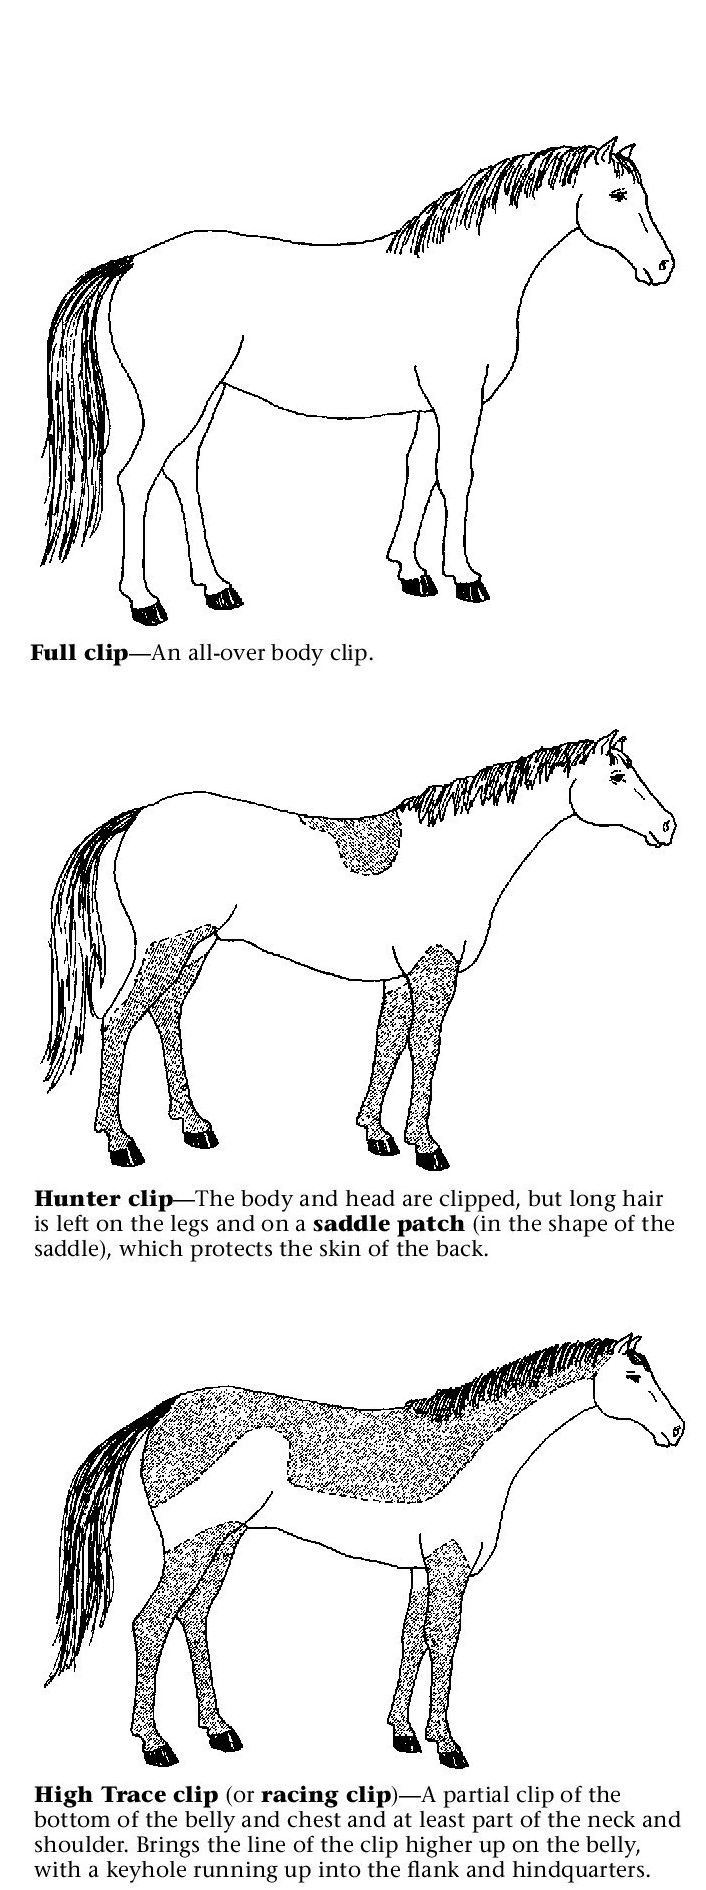
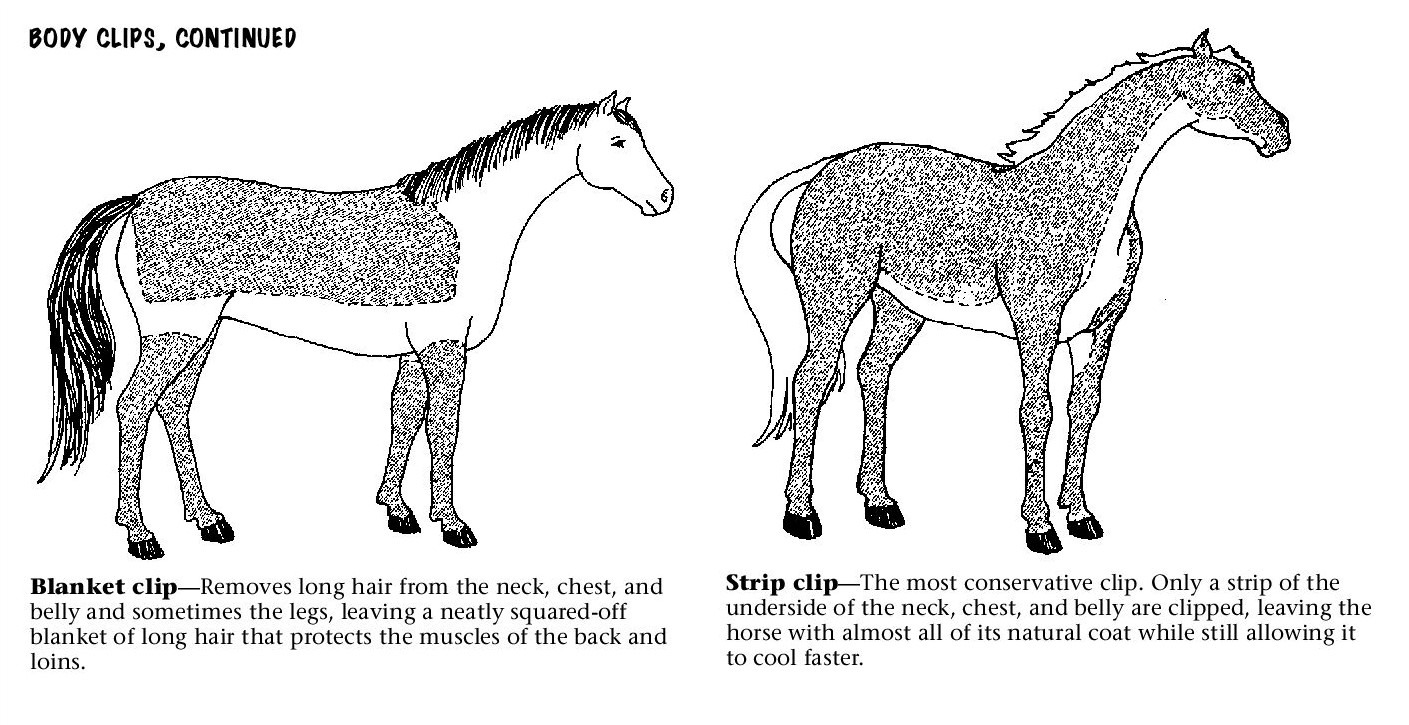
Body Clips
A pastured horse needs a natural winter coat. However, a hard-working horse’s coat becomes soaked with sweat and can take hours to dry. In cold weather, a wet coat quickly conducts heat away from the horse’s body, which can lead to chills. A body clip of some type may be a good solution.
A clipped coat is a bit shorter than summer length, so most horses with body clips require a blanket for protection from cold. With a partial clip, the horse does not get as hot and dries more quickly, but still has quite a bit of its natural coat, so it may not need a blanket.
To avoid needing to clip twice, wait until the horse sheds its summer coat and establishes its winter coat. If you clip in the spring, do it before the horse begins to shed. Otherwise, you’ll clip off the ends of the new summer coat and it won’t be as rich and glossy. A full clip usually grows out in about 3 months.
There are many types of body clips. The illustrations here show the most common ones.
Mane and Tail
A mane’s length is determined by breed type and use. Manes of stock horses and Hunters are usually thinned and shortened, or pulled. Natural manes and tails often need to be evened or thinned also. Scissors are not recommended for shortening manes.
To pull a mane, hold the ends of a small patch and push the shorter hairs up with a comb, then pull out just a few long hairs at a time. Brush it out frequently to check the length (usually 4 to 6 inches). The horse may tolerate only short sessions, and the job may take several days. Wear gloves to protect your hands.
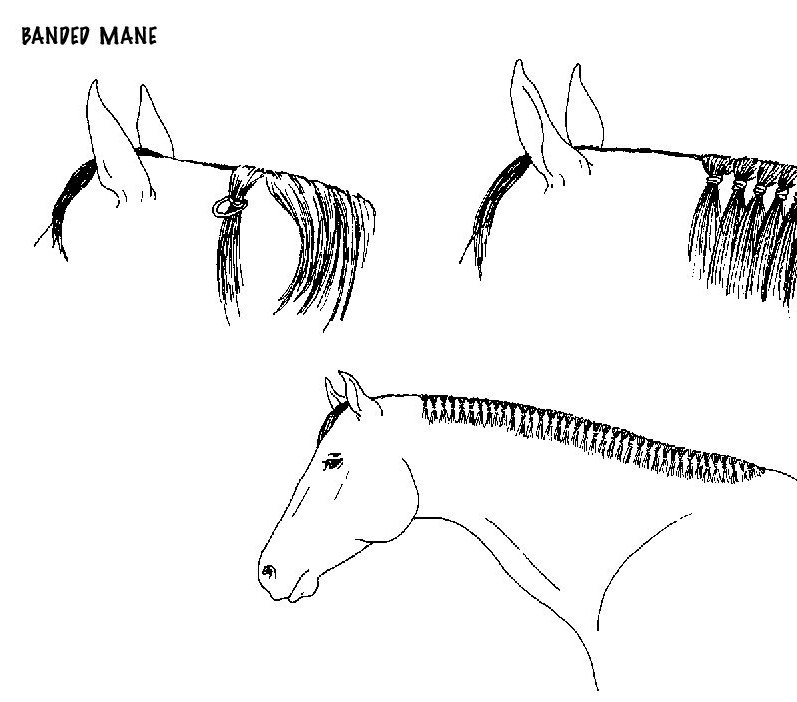
Train the mane to lie smoothly on one side. Banding is one way to do this. To band a mane, pull it to 3 to 4 inches in length.
Wet the hair and part it into small sections about ½ inch wide. Comb each section
down flat against the side of the neck and secure it with a rubber band that matches the color of the mane. Banding is acceptable in the show ring for hunter and Western horses.
The tail usually is left long, full, and natural. A bushy tail may be thinned and pulled. The tail may be banged (cut straight across) for hunter and dressage mounts or clipped or shortened depending on use and/or breed type.
Braiding
Hunters are traditionally braided for neatness and to enhance the horse’s conformation. Banding is not considered a traditional hunter braid.
Generally, if the mane is braided, the tail is braided as well, even though it is not required. It is not acceptable to braid the tail without braiding the mane.
Braiding is not allowed in saddle seat, but you may tie a ribbon by the bridle path.
Banding is acceptable in Western, though some breeds prefer long manes. It is a good idea to check the breed standard for the breed you are showing.
Mane
Braiding can improve the appearance of a horse with a full or coarse mane, but it must be done correctly. It is better not to braid a mane than to do it sloppily.
Thin and shorten the mane first. Ribbon or thread are recommended instead of rubber bands. Remove the braids as soon as possible to avoid breaking off hairs.
Separate a 2- to 4-inch segment of mane and wet it with a sponge, then comb. Separate the segment into three equal strands and braid two-thirds of the way to the end. Keep the braid very tight, especially at the beginning.
Use the illustration to help you.
1. Lay a 10-inch piece of yarn behind the braid. Add the ends to two of the strands of hair and keep braiding.
2. Separate yarn ends from the hair, wrap them around the braid, and pull through tightly.
3. Thread both yarn ends through a needle. Sew up through the top of the braid, around the left side, and wrap up through again.
4. Repeat on the other side of the braid.
5. Separate yarn ends, wrap them around, and tie them in the center. Cut the ends of the yarn short.
You also can fasten braids with two rubber bands (use size #8).
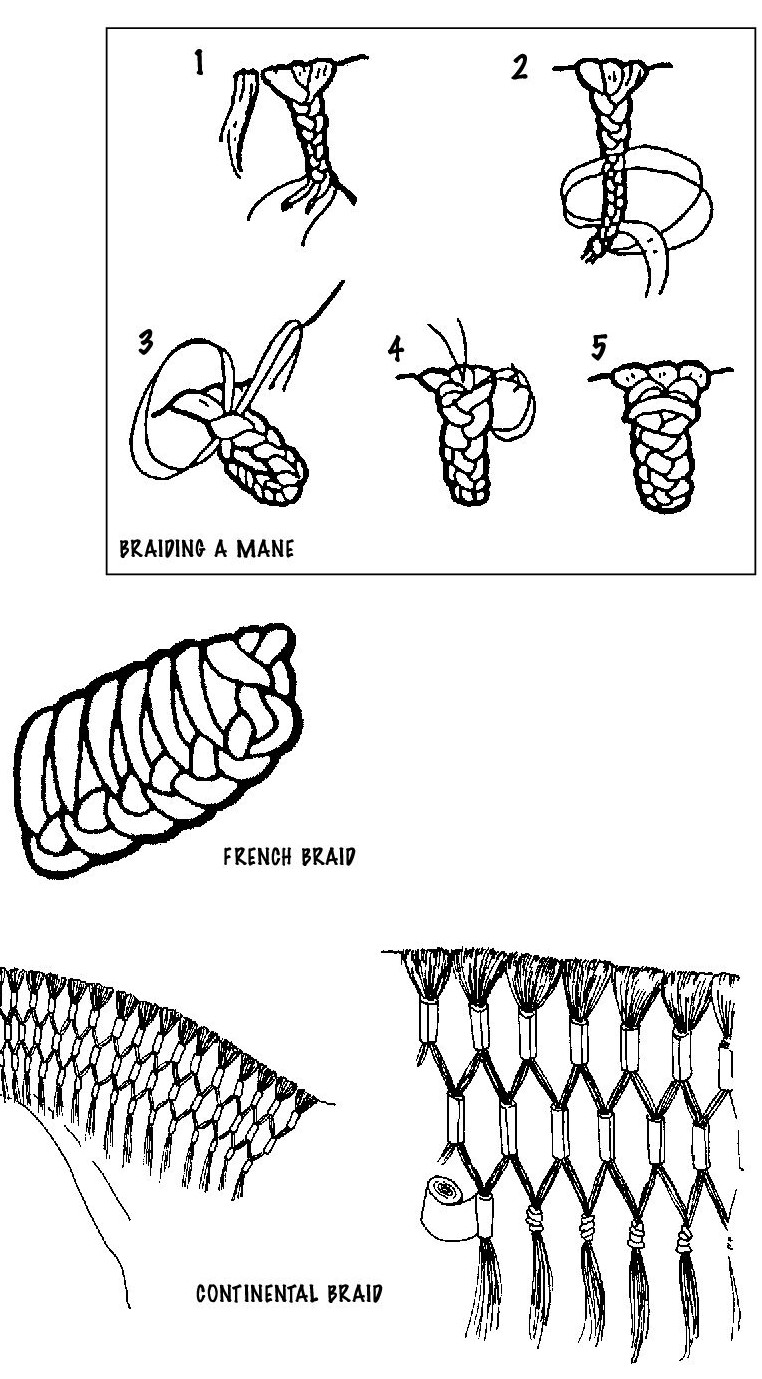
Other braiding techniques include scallops, sewn-in button braids, Continental braiding, and French braiding. French braiding is done on horses with long manes that you don’t want to cut or pull
short. Start a French braid with a 3-inch strand. When the braid has reached the desired length, begin adding a 1- to 2-inch section of mane each time you cross the left side of the
Tail
Tails are braided for neatness and to show off the hindquarters and legs. It gives the horse a finished appearance. To get a raised effect, go under each strand as you braid rather than over. To finish the tail, braid out about 5 or 6 inches, then double the braided end up with the unbraided section on top pointing up the tail bone. Put a rubber band around the doubled-back braid, then turn the braid under and slide it up underneath the tail braid until just a small braid is still showing. Finally, put a rubber band around the small loop at the
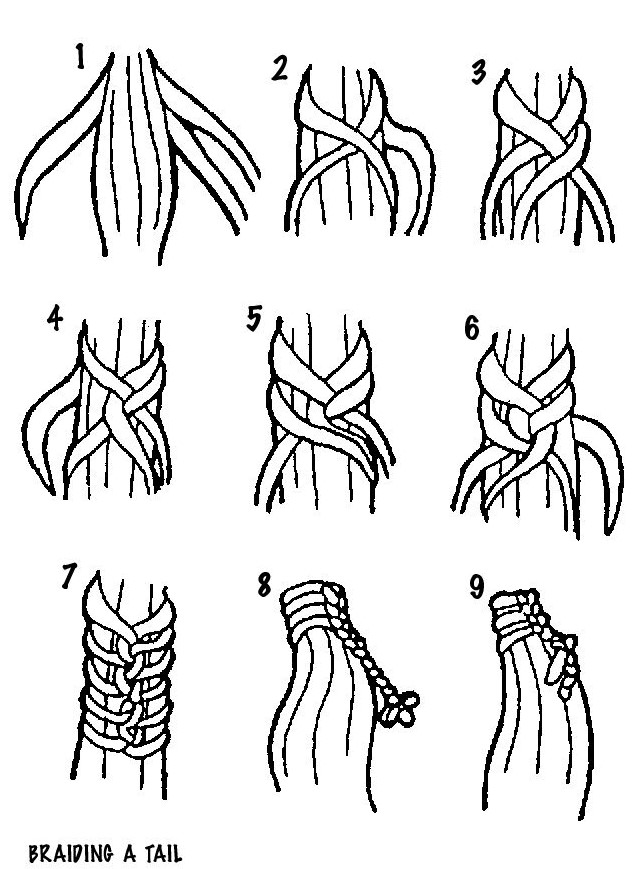
The pinwheel method is another way of finishing the tail braid.